Week 14: Interface and Application Programming
This week a new challenge has been set, programming and preparing the interface to be applied to the inputs and outputs of a device.
Introduction
Application of Autodesk Inventor in mobile application interface design
Although the design of mobile interfaces usually focuses on digital development —screens, icons, navigation—, there are projects where the physical and the digital converge. In these cases, tools such as Autodesk Inventor, traditionally associated with mechanical and industrial design, acquire a relevant role in the integral design of the user experience.
Inventor allows modeling and prototyping of physical devices or components that interact with mobile applications, such as cases, accessories, supports, wearables or complementary tactile elements. Its 3D environment facilitates the exploration of shapes, ergonomics and assemblies that directly influence how the user holds, manipulates or experiences the application from their device.
For example, in mobile applications with a playful, educational or therapeutic focus, Inventor can be used to design physical interfaces that amplify tactile interaction or offer a multisensory component. This is especially useful for specific audiences, such as children or older adults, who benefit from tangible experiences complementary to the digital environment.
In addition, Autodesk Inventor makes it possible to foresee fundamental technical details, such as the adjustment of electronic components (sensors, buttons, brackets for mobile devices) or the design of parts that will be integrated with mobile technology via Bluetooth, NFC or other forms of connectivity.
In short, Inventor not only contributes to the physical design of the environment surrounding a mobile application, but also enriches the user experience through solutions that integrate the visual, tactile and functional. Its application opens up new possibilities for designing more accessible, interactive and connected interfaces, where the boundary between the digital and the material becomes increasingly blurred and collaborative.
The Application Programming Interface (API) is a set of rules or procedures that allow software applications to talk to each other to share data, features, and functionality. They simplify application and software development by allowing developers to integrate data, services, and functionality from other applications rather than having to recode them from scratch. They also allow only the necessary information to be shared and other internal system details to be omitted.
API Types
APIs can be classified by use cases:
- Data APIs
- Operating System APIs
- Remote APIs
- Web APIs
Examples of APIs
APIs have become a valuable aspect of modern business and personal applications. Here are some examples of such applications:
- Universal Login: The ability to log into websites using credentials from Facebook, X, or Google profiles.
- Internet of Things (IoT): These ‘smart devices’ offer additional functions, such as web-enabled touch screens and data collection via APIs.
- Social Media: Social media companies use APIs to allow other companies to share and embed content from social media applications on their own websites.
Individual Assignment
Individual Assignment: This week we will develop an application for mobile phones that will allow us to control a servo motor from our device. Using an ESP32-CAM development board, equipped with an integrated Bluetooth module, we will simplify the process of controlling the servo motor.
1. Programming with App Inventor
The development of the mobile application was carried out using App Inventor, a development environment created by MIT that allows us to create applications for the Android operating system for free. The program enables our board as a Bluetooth device, making it visible to other devices.
The app interface includes:
- A button that shows the devices visible for connection and the connection status of the device to the development board.
- A button to send the character ‘1’ to move the servo to 180° or ‘0’ to return it to 0°.
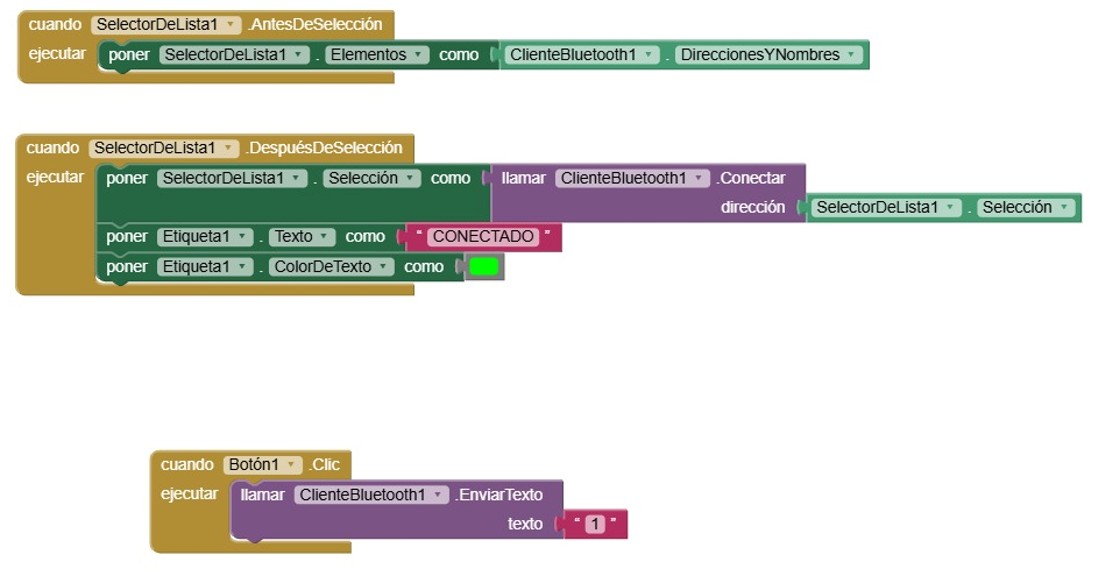
The application logic was implemented using visual blocks that:
- Paired Bluetooth devices are listed.
- The selected device must be connected.
- Update the label to show ‘CONNECTED’.
- Send the character ‘1’ or ‘0’ when pressing the button.
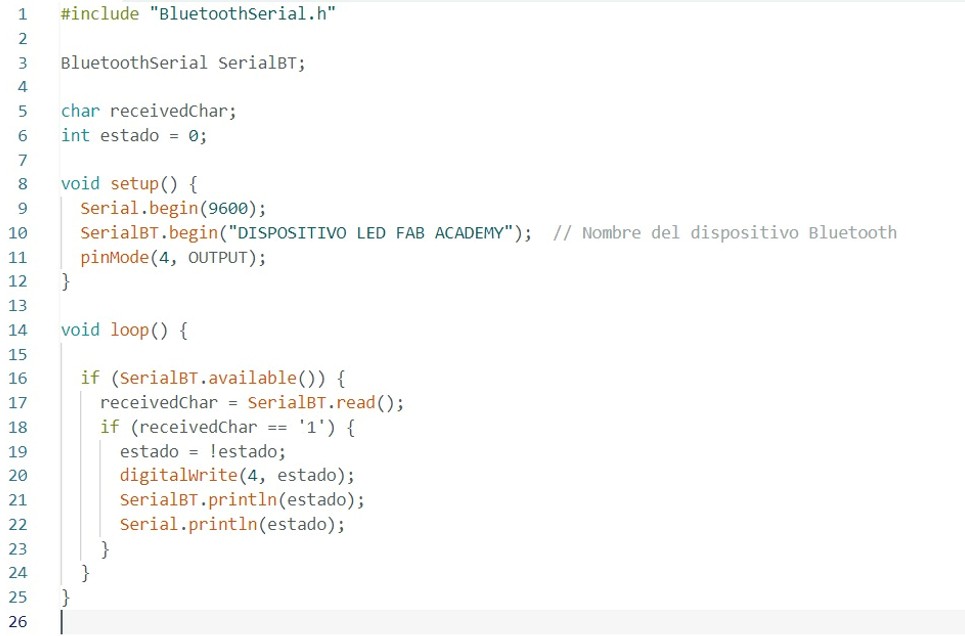
2. ESP32 Code
The ESP32-CAM runs Arduino code that:
- Initializes the servo motor on pin 4.
- Starts Bluetooth communication.
- Listens for incoming characters from the app.
- Moves the servo to 180° and returns to 0° with timed delays.
It is necessary to install the BluetoothSerial library, as it is a prerequisite for the correct functioning of the system. The code takes data from the mobile application, changing the servo position every time the button is pressed: (1) 180°, (0) 0°.
#include#include BluetoothSerial SerialBT; Servo myServo; const int servoPin = 4; char receivedChar; void setup() { myServo.attach(servoPin); myServo.write(0); // Initial position Serial.begin(115200); SerialBT.begin("ESP32_CAM"); // Bluetooth device name Serial.println("Bluetooth Started! Pair with ESP32_CAM"); } void loop() { if (SerialBT.available()) { receivedChar = SerialBT.read(); Serial.print("Received: "); Serial.println(receivedChar); if (receivedChar == '1') { myServo.write(180); // Move to 180 degrees Serial.println("Servo at 180°"); delay(500); // Wait for servo to reach position } else if (receivedChar == '0') { myServo.write(0); // Move to 0 degrees Serial.println("Servo at 0°"); delay(500); // Wait for servo to reach position } } delay(100); // Small delay for stability }
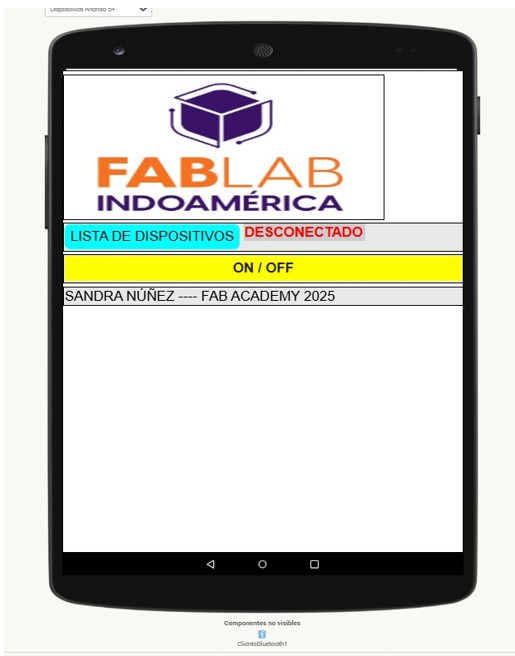
3. Mobile Application – App Inventor
The mobile interface was created with MIT App Inventor. It includes:
- A connection status indicator, which can show whether the connection is connected or disconnected.
- A button to send the activation signal (‘1’ or ‘0’).
- The FABLAB Indoamerica logo.
- User information and mention of Fab Academy 2025.
In the video you can see how you can turn on and off the led light of the ESP32 Cam board through the bluetooth connection of the board with the cell phone. For this to work in the block programming part of the ESP32 Cam board, the bluetooth function was called. Once the devices are linked, you can test the function of turning the LED on and off.
4. Function Test Procedure
To begin the function test, we must first click on the “Device List” section of the mobile application interface. This action will prompt the system to search for nearby Bluetooth-enabled devices.

Note: Ensure that Bluetooth is enabled on your smartphone or tablet. If the list of available devices does not appear, it is likely that Bluetooth is disabled or the ESP32 module is not powered or in pairing mode.

In our case, the list of available devices appears correctly (see image). Among the detected devices, we must select the one named “Fab Lab LED Devices”. This is the identifier that we previously programmed into the ESP32 for Bluetooth communication.
This step is crucial, as it establishes the serial link between the mobile app and the ESP32 microcontroller using
Bluetooth communication (typically via the BluetoothClient block in MIT App Inventor). Once the connection is
successful, the status indicator in the app interface changes from "DISCONNECTED" to
"CONNECTED".
Test Execution and Results
After selecting the correct device, the app allows us to control an LED connected to the ESP32 board. Specifically, we can toggle the LED on and off through a simple user interface. This confirms that the Bluetooth communication between the mobile device and the ESP32 works correctly and that the command messages are being interpreted and executed as expected by the microcontroller.
Outcome: The test was successfully completed. The mobile app and ESP32 communicate reliably via Bluetooth, and the LED responds as intended to the user commands.
Development Challenge
During the app development process using MIT App Inventor, one of the main challenges I faced was configuring the Bluetooth connectivity blocks properly. Initially, I encountered issues with detecting and pairing the ESP32 device.
To solve this, I researched various resources, including online documentation, forums, and YouTube tutorials focused
on App Inventor and ESP32 integration. I learned to properly use the BluetoothClient, ListPicker,
and event-handling blocks (such as AfterPicking and Clock.Timer) to manage device discovery,
selection, and data transmission.
Reflection
This experience helped me understand the asynchronous nature of Bluetooth communication and the importance of correct block sequencing for robust app behavior.
Final Results Gallery
Conclusion
Creating an interface or application first requires obtaining useful data from the computer's circuit board. Then, it is necessary to establish a connection between that data and an interface that allows users to interact with it, depending on the specific ‘tool’ or language used to visualize it. From this perspective, this week's challenge gives us several possibilities to create friendly and useful interfaces that facilitate the articulation between artefacts and users, which is a very important aspect nowadays.
Group Assignment
Objective
This week's group assignment focused on comparing three different tools used to create user interfaces for interacting with embedded systems. The aim was to evaluate each tool’s strengths, weaknesses, and applicability in educational or prototyping contexts.
Group Members
- Sandra Hipatia Núñez Torres
- Manuel Ignacio Ayala Chauvin
Tools Compared
| Tool | Type | Strengths | Limitations | Device Used |
|---|---|---|---|---|
| MIT App Inventor | Visual (Mobile) | Easy to learn, ideal for beginners, fast prototyping | Limited design flexibility and professional polish | ESP32 |
| Blynk | IoT Dashboard | Widget-based, fast connection, supports sensors & GPIO | Requires internet (for cloud), limitations in free tier | ESP32 |
| Flutter | Cross-platform App | Beautiful, customizable UI, full control | Higher complexity, requires Dart and setup | ESP32 |
Key Findings
- MIT App Inventor is perfect for quick prototyping, especially for educational use. It allowed us to build a Bluetooth interface quickly and with minimal coding.
- Blynk is highly effective for IoT applications. It has ready-made widgets for buttons, sliders, and sensor displays, making it easy to create functional interfaces without writing much code.
- Flutter offers the highest degree of control and design quality, suitable for creating professional-grade apps. However, it has a steep learning curve and requires prior programming experience.
Conclusion
Each tool serves a specific purpose. App Inventor is best for rapid, low-complexity projects. Blynk is optimal for connected IoT dashboards. Flutter is powerful for developers who require fully customized, scalable apps. As a group, we understood that choosing the right interface tool depends on the user’s experience level, the project’s scope, and the desired user experience.